

Table of Contents
1. Restore Foggy Headlights with Toothpaste
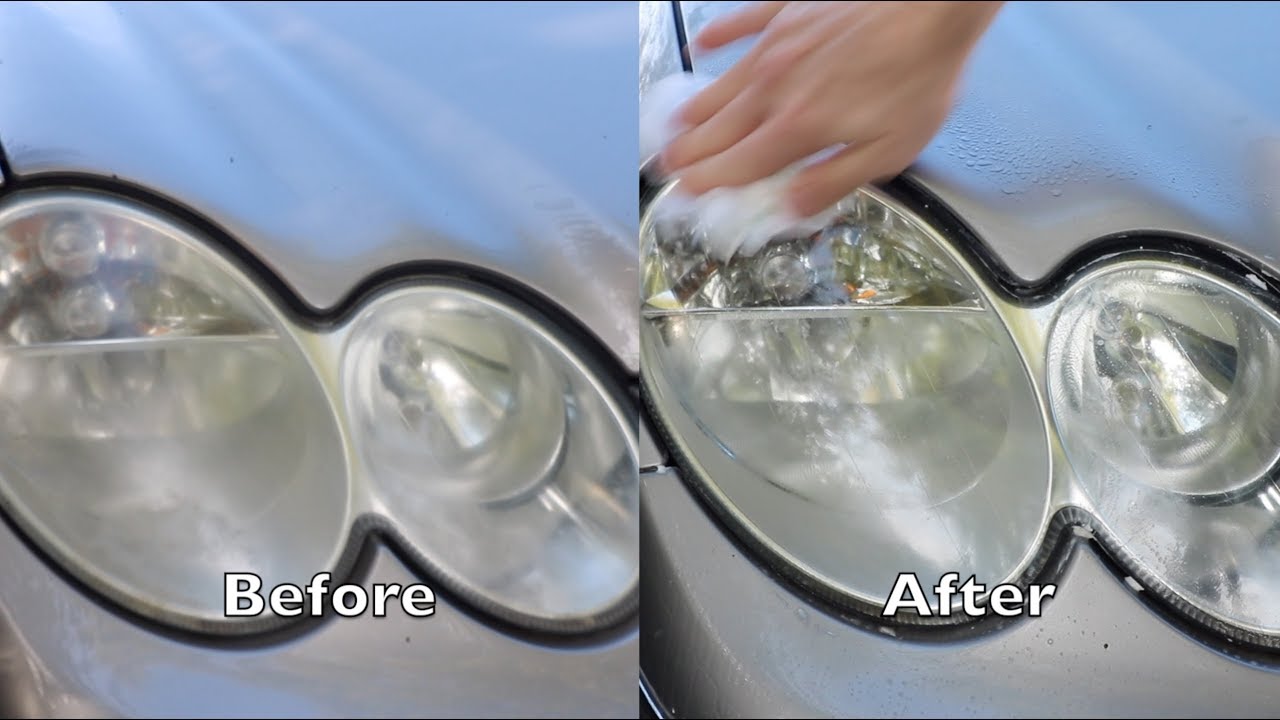
A Simple Hack with Surprising Results
Headlight haze is more than an aesthetic annoyance — it’s a critical safety issue. As headlights age, their polycarbonate lenses oxidize, turning cloudy and yellowed. This significantly reduces light output, diminishing visibility during nighttime and inclement weather. Fortunately, there’s an unassuming yet remarkably effective remedy that sits on nearly every bathroom shelf: toothpaste.
The abrasive particles in whitening toothpaste work much like a gentle polish. These micro-abrasives buff away the oxidized layer on the headlight’s surface, revealing a clearer, brighter lens underneath. This method is an accessible, cost-efficient alternative to professional-grade polishing kits.
How It Works
To begin the restoration, thoroughly clean the headlight lens using soap and water to remove surface dirt and grime. Dry the lens completely. Then, apply a generous dollop of whitening toothpaste directly to the headlight. Using a soft microfiber cloth or sponge, rub the toothpaste into the lens using firm, circular motions for several minutes. This mechanical action, aided by the toothpaste’s mild abrasives, breaks down the oxidation and lifts it away.
After scrubbing, rinse the lens with clean water and wipe it dry. The result is a noticeably clearer headlight that not only looks better but performs significantly more effectively.
Benefits Beyond Aesthetics
Clarity in headlight performance directly correlates to road safety. By restoring foggy headlights with toothpaste, drivers can regain up to 80% of their original light output. This enhances visibility on poorly lit roads, improves contrast during dusk, and increases reaction time during sudden braking scenarios.
Moreover, this do-it-yourself approach saves money. Replacing headlights or hiring a detailer can cost upwards of $100–$300 per lens. A simple tube of whitening toothpaste — usually less than $5 — offers a high-impact return on investment.
Tips for Optimal Results
- Use only white, non-gel toothpaste. Gel versions typically lack the abrasives necessary for effective polishing.
- For heavily oxidized headlights, repeat the process twice for deeper clarity.
- To protect the lens after cleaning, consider applying a UV sealant. This will help prevent future yellowing by shielding the lens from harmful ultraviolet rays.
A Preventative Maintenance Habit
Making headlight cleaning part of a routine maintenance schedule pays dividends in both appearance and performance. Ideally, this treatment should be performed every three to six months depending on climate and vehicle usage. In high-sunlight or coastal areas where UV exposure is intense, more frequent cleaning may be beneficial.
Driving Safer, Seeing Better
With minimal tools, no mechanical skill, and a bit of elbow grease, drivers can restore clarity, safety, and confidence behind the wheel. The brilliance of this solution lies in its simplicity. For those seeking functional yet frugal automotive upkeep, “1. Restore Foggy Headlights with Toothpaste” is a smart, actionable hack every driver should know.
2. Use a Penny to Check Tire Tread Depth
A Time-Tested Trick for Tire Safety
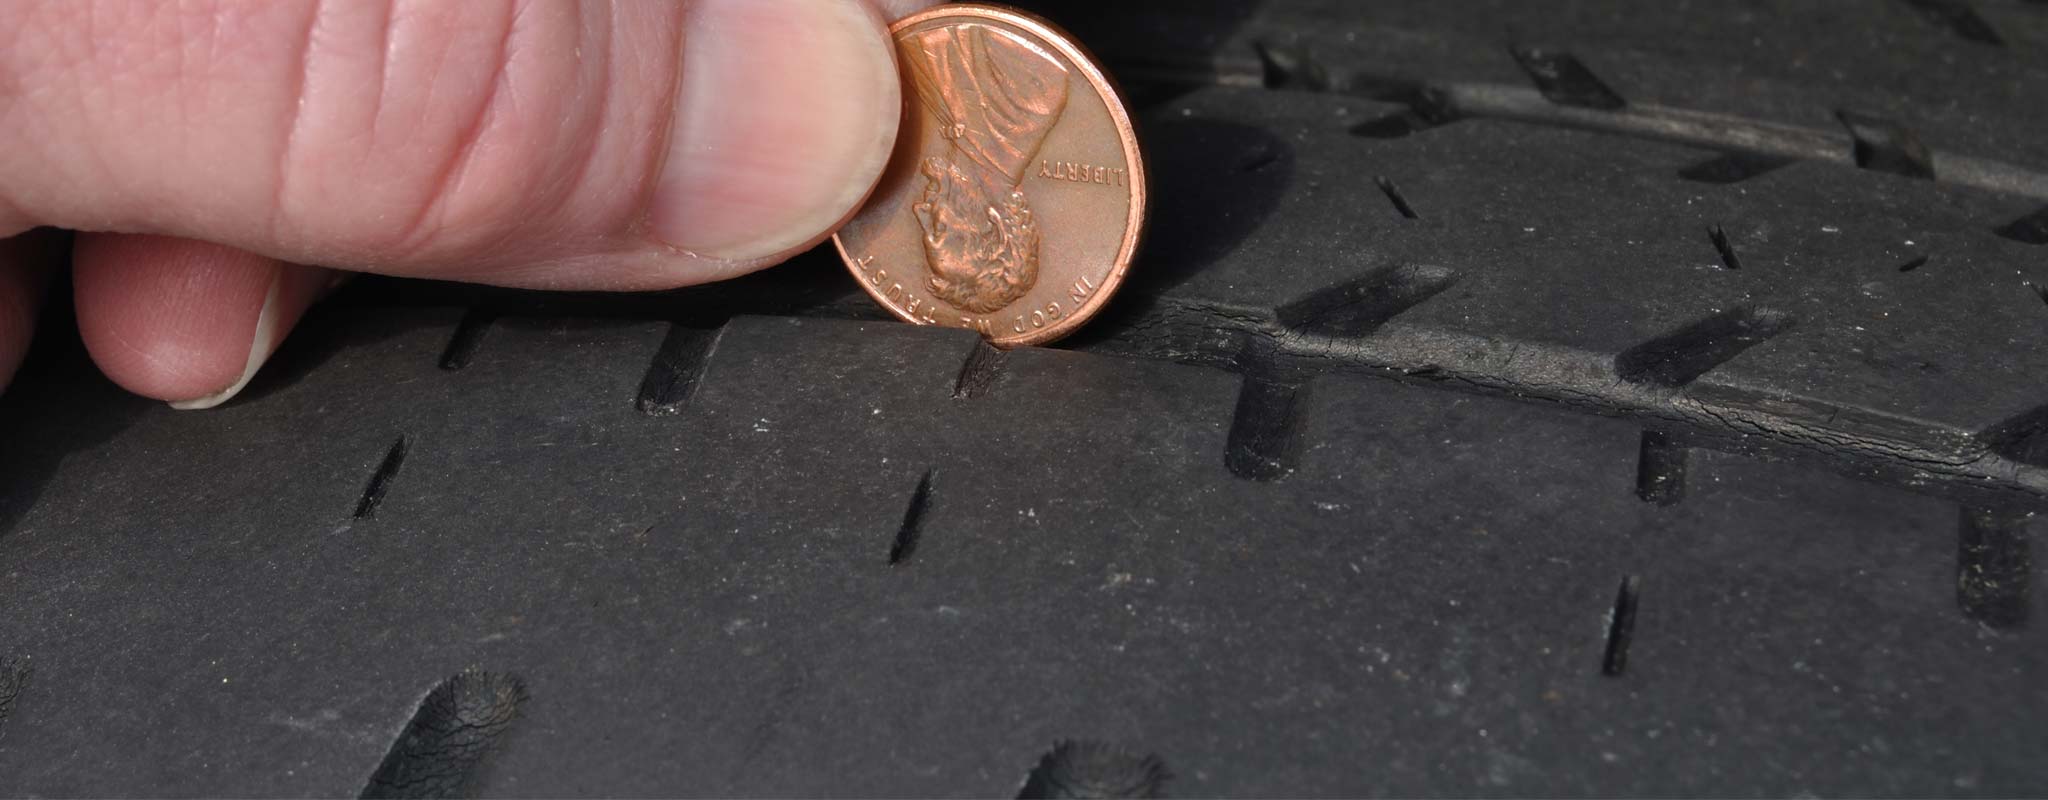
Tire tread depth is a crucial indicator of vehicle safety, dictating traction, stability, and braking performance. As tires wear, their ability to grip the road — especially in wet or slippery conditions — is significantly compromised. Fortunately, there’s a simple, no-cost method to assess tread health that requires nothing more than a common coin: the humble penny.
This centuries-old copper companion isn’t just pocket change. It’s an effective diagnostic tool for gauging tread depth in seconds. “2. Use a Penny to Check Tire Tread Depth” remains a trusted hack in automotive circles, relied upon by drivers and mechanics alike.
How the Penny Test Works
Begin with a clean, dry tire. Insert a U.S. penny into the tread groove with Abraham Lincoln’s head facing downward, toward the tire. Observe how much of his head remains visible. If the top of Lincoln’s head is fully exposed, your tread has worn to a critical level — typically 2/32 of an inch or less — and the tire should be replaced immediately. If part of his head is still covered by the tread, your tires retain a safe amount of grip.
Repeat this process at multiple points around each tire. Tread depth can vary across the surface due to alignment or inflation issues. Inspect the outer edge, center, and inner groove to ensure even wear and accurate results.
Why It Matters
Tread depth directly affects hydroplaning resistance, cornering grip, and emergency braking efficiency. Bald or shallow treads increase stopping distance, reduce control during turns, and make your vehicle more vulnerable on wet roads. A tire that passes the penny test provides peace of mind and essential roadworthiness.
Moreover, tires that fail this test are often deemed legally unsafe. In many states, 2/32 of an inch is the minimum allowable tread depth. Driving below that threshold not only endangers lives but may also incur fines or inspection failures.
The Benefits of This Hack
- Cost-free and instant: No tools or gadgets needed — just a penny.
- Universal accessibility: Works with all tire brands and models.
- Enhances awareness: Encourages regular, proactive tire checks, promoting a culture of automotive responsibility.
Pro Tips for Better Accuracy
- For improved precision, use a tire tread depth gauge after the penny test if uncertainty remains.
- Rotate tires every 5,000 to 7,500 miles to promote even tread wear.
- Ensure tires are properly inflated — underinflation accelerates edge wear while overinflation wears the center tread prematurely.
A Copper Coin for Confidence
In a world of digital diagnostics and tech-laden dashboards, this analog technique remains remarkably effective. It’s simple, swift, and invaluable. Keeping a penny in your glovebox could mean the difference between a safe commute and a dangerous detour. Trust in “2. Use a Penny to Check Tire Tread Depth” as a steadfast component of smart vehicle maintenance.
3. Prevent Windshield Fog with a DIY Dehumidifier

A Clever Fix for Clear Vision in Any Weather
Few things disrupt a morning commute like a fogged-up windshield. Visibility plummets. Frustration rises. The root cause? Moisture accumulation inside your vehicle. Condensation, triggered by temperature disparities between the cabin and exterior, clings to the windshield — obscuring your view and creating a safety hazard. The solution doesn’t require pricey gadgets or chemical defoggers. “3. Prevent Windshield Fog with a DIY Dehumidifier” offers a smart, low-cost remedy that keeps your glass crystal-clear.
How Moisture Becomes a Menace
Every breath, wet shoe, or damp umbrella introduces humidity into your car’s enclosed space. When warm, moist interior air meets the cold surface of a windshield, condensation forms — a natural but annoying phenomenon. Left unchecked, this recurring fog can hinder driving conditions and reduce defroster efficiency.
Crafting the DIY Dehumidifier
This innovative hack begins with two simple components: a pair of clean socks and silica-based cat litter. Yes, cat litter — a surprisingly effective desiccant. Fill one sock with the litter, knot the end, and slide it into a second sock for durability and aesthetics. Place your homemade dehumidifier on the dashboard, under a seat, or anywhere it can discreetly absorb ambient moisture.
For enhanced performance, create two or three and position them throughout the vehicle’s cabin. They’ll silently draw in excess humidity, preventing fog from forming overnight or during sudden temperature drops.
Why This Hack Works
Silica crystals within cat litter are engineered to trap moisture without leaking or releasing it back into the air. As they saturate, they continue to pull humidity from enclosed spaces — making them ideal for fog prevention in vehicles. Unlike air fresheners or commercial defoggers, this DIY solution works passively and continuously.
Added Benefits Beyond Fog Control
- Cost-effective and reusable: A few dollars for a bag of litter can last for months.
- Non-toxic and scent-neutral: No harsh chemicals or artificial fragrances required.
- Multifunctional: Helps reduce interior mold risk, stale odors, and damp upholstery.
Pro Tips for Optimal Results
- Use high-quality, unscented silica cat litter for best absorption.
- Replace the contents every few weeks or when saturation is evident (sock feels damp or heavier).
- Pair with regular cabin air filter checks to reduce humidity from HVAC circulation.
A Simple Strategy for Safer Driving
Windshield fog can appear suddenly, especially in colder seasons or during rainy spells. Traditional fixes, like blasting the defroster or wiping the glass, are temporary at best — and dangerous at worst. By embracing “3. Prevent Windshield Fog with a DIY Dehumidifier,” you gain a sustainable, set-it-and-forget-it solution that enhances driving safety and convenience year-round.
Clear glass isn’t just a comfort. It’s a necessity. This practical hack transforms common household items into a powerful defense against impaired visibility, ensuring you always drive with clarity and confidence.
4. Clean Wiper Blades with Vinegar
A Simple Solution for Streak-Free Visibility
Windshield wipers are among the most underrated components of vehicular safety. When functioning optimally, they offer a crystal-clear field of vision. But over time, grime, road debris, and environmental contaminants compromise their effectiveness. Streaks appear. Chatter sounds emerge. Visibility is reduced. One of the easiest and most cost-effective solutions lies in an age-old household staple: vinegar. The hack titled “4. Clean Wiper Blades with Vinegar” is as efficient as it is accessible.
Why Vinegar?
White distilled vinegar is a natural acetic acid, renowned for its ability to cut through buildup, mineral deposits, and oily residue. When applied to rubber wiper blades, it dissolves the gunk that accumulates from daily driving—be it pollen, salt spray, or industrial film. The result? A more supple blade edge that glides cleanly across your windshield without leaving murky streaks or missing spots.
Step-by-Step Cleaning Guide
- Prepare your tools: Gather a clean microfiber cloth and a small bowl of undiluted white vinegar.
- Lift the wiper arms: Prop them up gently away from the windshield to access the rubber blades.
- Wipe thoroughly: Soak the cloth in vinegar and run it along the length of each blade multiple times, removing dirt, oxidation, and debris.
- Dry and test: Let the blades air-dry for a few minutes before testing their clarity with a quick spray of washer fluid.
The entire process takes less than five minutes but delivers disproportionately large benefits.
The Long-Term Payoff
Cleaning your wiper blades with vinegar on a biweekly basis can extend their lifespan significantly. Most people replace their blades when they start streaking, unaware that residue—not wear—is often the culprit. This method revives performance and saves money over time. Moreover, it reduces the chance of micro-scratches forming on your windshield due to trapped particles—a detail that enhances long-term clarity and value retention.
Environmental and Financial Perks
- Non-toxic and biodegradable: Vinegar offers a green alternative to commercial cleaners filled with synthetic chemicals.
- Affordable upkeep: A bottle of vinegar costs less than a cup of coffee and lasts for dozens of cleanings.
- Less waste: Prolonging blade life reduces landfill waste from frequent replacements.
Bonus Tip: Clean the Windshield Too
To amplify results, follow your blade cleaning with a vinegar wipe-down of the windshield itself. This holistic approach ensures both the wiper and the surface are pristine, preventing smear-prone interactions.
Crystal Clarity Without Complexity
Modern problems don’t always require modern solutions. “4. Clean Wiper Blades with Vinegar” highlights how traditional know-how can enhance driving safety with minimal effort. With cleaner blades, visibility improves. Confidence behind the wheel increases. And the road ahead becomes clearer—literally and figuratively.
5. Use Baking Soda to Eliminate Car Odors
A Natural Deodorizer for a Fresher Ride
Unpleasant odors inside a vehicle can turn every commute into an uncomfortable experience. Whether it’s lingering fast-food aromas, pet smells, smoke residue, or mysterious mustiness, the cabin’s air quality directly affects your mood and driving comfort. One of the simplest, most effective remedies is nestled in your kitchen pantry: baking soda. With the spotlight on “5. Use Baking Soda to Eliminate Car Odors,” this underrated powerhouse proves it belongs in every driver’s car care arsenal.
Why Baking Soda Works
Scientifically known as sodium bicarbonate, baking soda is not just a deodorizer—it’s an odor neutralizer. Rather than masking foul smells with overpowering scents, it chemically absorbs and breaks down malodorous compounds. Its high pH balance reacts with acidic and basic molecules alike, nullifying offensive smells at their source. The result? A car interior that feels cleaner, fresher, and more breathable.
Step-by-Step Application
- Identify the source: Before deodorizing, locate and remove any contributing items—old food containers, gym bags, or damp upholstery.
- Sprinkle generously: Dust baking soda directly onto seats, floor mats, and fabric surfaces. Focus on high-traffic or problem zones.
- Let it rest: Allow it to sit undisturbed for several hours—overnight if possible—to give the compound time to absorb deep-seated odors.
- Vacuum thoroughly: Use a powerful vacuum to extract the baking soda, along with the odors it has encapsulated.
This no-sweat routine requires minimal effort but delivers exceptional results.
Additional Usage Tips
- Cup method: For continuous freshness, place an open container of baking soda in the cup holder or under a seat. It will act as a passive deodorizer for weeks.
- Fabric refresh: Mix baking soda with a few drops of essential oil and store in a breathable sachet to keep your car smelling pleasant over time.
- Stain companion: Spills that cause odors—such as milk or soda—can be treated with baking soda after blotting to prevent sour smells from forming.
Eco-Friendly and Cost-Effective
Baking soda offers an environmentally conscious alternative to artificial air fresheners. It contains no synthetic fragrances, propellants, or toxic chemicals—making it safe for children and pets. Additionally, it’s incredibly budget-friendly. For just a few cents per application, drivers can restore their vehicle’s olfactory appeal without resorting to chemical-laden sprays or pricey detailing services.
Beyond the Nose: Enhanced Resale Value
A neutral-smelling vehicle not only enhances daily comfort but can also positively impact resale or trade-in value. Smells leave impressions. A clean, fresh interior suggests better maintenance habits, creating trust with prospective buyers or dealers.
The Invisible Upgrade
“5. Use Baking Soda to Eliminate Car Odors” isn’t just a cleaning tip—it’s a quality-of-life improvement. Odor control with baking soda bridges practicality and sustainability, offering a chemical-free way to enhance every ride. By embracing this simple hack, drivers enjoy a cabin that smells as good as it feels—welcoming, refreshing, and revitalized.
6. Check Tire Pressure Regularly
Maintaining proper tire pressure improves fuel efficiency and extends tire life. Use a tire pressure gauge to check each tire monthly, especially before long trips. Properly inflated tires ensure better handling and safety on the road. (Craft Your Happy Place, Worthly)
7. Use a Headrest to Break a Window in Emergencies
In situations where you need to escape a submerged vehicle, removing the headrest and using its metal prongs to break the side window can be lifesaving. Insert the prongs into the gap between the window and the door frame, then pull back to shatter the glass. This knowledge can be critical during emergencies. (Listverse)
8. Keep Battery Terminals Clean with Baking Soda
Corroded battery terminals can lead to starting issues. Cleaning them with a mixture of baking soda and water neutralizes the acid and removes corrosion. Apply the mixture with a toothbrush, scrub gently, rinse with water, and dry thoroughly. Regular maintenance ensures reliable battery performance. (Craft Your Happy Place, wowowow.com)
9. Use Shoe Polish to Cover Minor Scratches on Leather Seats
Minor scuffs on leather seats can be concealed using matching shoe polish. Apply a small amount to the affected area with a soft cloth, rubbing gently in circular motions. This quick fix can improve the appearance of your car’s interior without professional repairs. (Gadget Review)
10. Utilize a Sock Filled with Rice as a Dehumidifier
To combat interior moisture and prevent window fogging, place a sock filled with uncooked rice under the seat or on the dashboard. The rice absorbs excess humidity, keeping the cabin dry and windows clear. This simple solution is especially useful during rainy seasons. (Gadget Review)
By incorporating these smart automotive repair hacks into your routine, you can enhance your driving experience, improve safety, and save on maintenance costs. Regular attention to these simple tasks ensures your vehicle remains in optimal condition.


